Haven’t cleaned your blender in a while? Here’s how to keep your blender spic and span for smooth functioning and higher durability.
Love making smoothies and shakes in your blender? Then it is quite natural to have your blender get dirty often. Ask anybody who loves making purees and juices in their blender about the pain of cleaning the blender after every use and they would talk your ears off about all the struggles and obstructions that they have to face every day.
A lot of us neglect cleaning our blender which can lead to corrosion and can leave you with a damaged and unusable blender. So, stop slacking off and make sure that you clean your blender thoroughly and regularly.
We understand that cleaning your blender is not an easy and simple task and requires a lot more than just scrubbing but it is important if you don’t want any bacteria growth inside your blender due to the leftover food bits. Here are 6 easy steps to clean your blender in a quick and painless fashion and it takes just 10 minutes of your time!
Material Needed:
- Baking Soda
- Clean Cloth
- Sponge
- Mild Dish Soap
Steps to be followed:
Step 1: Dismantle your Blender
If you really wish to clean your blender properly then you will first need to take apart your blender and clean all the blender pieces separately. To disassemble your blender, you first need to make sure that your blender isn’t turned on. Unplug the blender from the socket and then carefully remove the blender jar from the motor base.
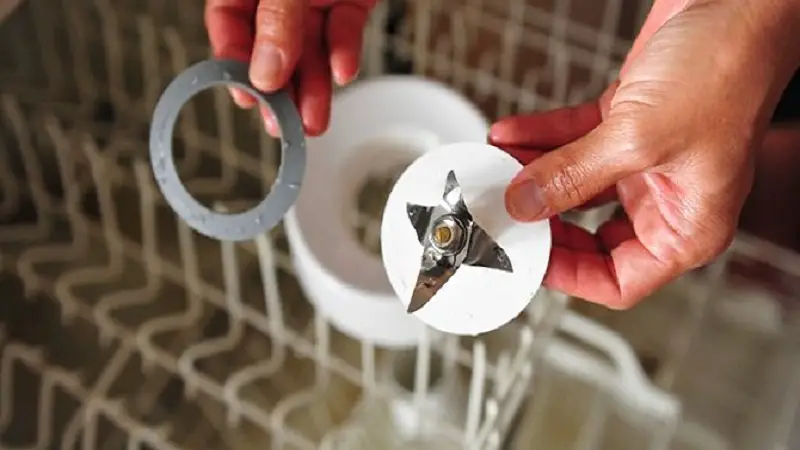
You also need to detach the jar lid and loosen the screws of the jar base. Make sure that you are careful while disassembling the blender parts and be extra careful around the blender blades. Finally, you need to remove the gasket seal and the blender blades before you start the cleaning process.
Here’s how it’s done
Step 2: Clean the Blender Jar
The blender jar is the main component that needs to be carefully and thoroughly cleaned. You can use warm soapy water and a sponge to clean your jar but make sure that you rinse it thoroughly with clean water before you re-assemble it. Spend at least 5-10 minutes in the cleaning of the jar and scrub properly every inch of the blender with a sponge to ensure that there is no dirt or food particle left in the jar.
You can also clean your blender jar in a dishwasher by placing it on the top rack but it won’t be as efficient as hand-cleaning. The dishwasher might also leave some scratch marks on your glass or plastic jar and could also damage the jar which will make it look unappealing and old. You might also end up buying a new blender jar so better hand clean your blender jar.
Must read:
- 15 Smoothie Recipes for the Fitness Freak in You
- Best Blender for Smoothies 2020 – Ultimate Buyer’s Guide!
Step 3: Clean the Blender pieces
Apart from cleaning the blender jar and the other major components, you also have to wash and dry the smaller blender parts and pieces like cutting blade, locking ring, gasket seal, and so on. You can hand wash them with the help of warm soapy water but be careful when cleaning the blade and avoid cutting yourself with the sharp edges of the blade. Once you are done cleaning the parts, make sure that you rinse them with clean water and then dry it off thoroughly before you put it back into the blender.

Step 4: Remove the stuck food items
Now, you need to focus on cleaning the blender itself and you will have to pay extra attention to it if you haven’t cleaned it in a while. There are chances that many food items and dried off dust and dirt might have stuck in the inside of the blender which won’t come off easy but with the help of a baking soda solution, you can easily clean your blender in a few minutes. Just take water and baking soda solution in 1:1 ratio and pour this solution into the blender. Then turn on your blender and let this solution run for a little while to get rid of all the hard stains and dried food pieces.
After a few minutes, turn off the blender and drain the solution in the sink and then rinse it a couple of times with clean water to remove any residual solution. Once that is done, you need to disassemble your blender again to follow the cleaning process from step 1.
Step 5: Wash the Motor Housing
Cleaning the motor housing of your blender is equally important if you want your blender to run smoothly and uninterruptedly. However, you must always ensure that the blender is unplugged before you start cleaning the motor housing.
Once you have turned off your blender and unplugged it, you need to take a warm, damp cloth and use it to wipe down the base of the motor. Make sure you never pour water on your motor base or put it in a dishwasher as it can damage your motor. The motor cord also needs to be cleaned occasionally with a damp cloth and should be checked for damages after every few days.
Step 6: Reassemble the Blender and store it properly
Once you have cleaned all the blender accessories, parts, etc., you need to dry it properly before re-assembling it. Once it is completely dried, you can re-assemble it and test if it is working properly or not. You can now store it in a dry place such as your countertop if you use it frequently. If you don’t use your blender too often then you might want to store it in a cupboard or shelf.
Tips for cleaning your Blenders and Keeping them New
Once you follow the above-mentioned steps, you will be able to keep your blender properly cleaned and fresh looking and will not have to worry about bad odor or stain in your blender anymore. Here are a few tips that can further help you in keeping your blender fresh and polished.
- Always check your manufacturer’s manual when cleaning your blender and make a note of all the blender parts available in your model that will need to be cleaned and then re-assembled.
- If you own a blender whose lid comes apart in two pieces then you might need to clean both the pieces separately. You can check your manufacturer’s manual if your blender lid comes apart in two pieces or not.
- If you own a plastic or glass jar blender then it is advisable to hand-wash them instead of using a dishwasher. A dishwasher might cause scratches or could damage your jar blender which will affect your blender life and would force you to replace your blender sooner than you anticipated.
- Avoid smelly food in your blender by cleaning it after every use. However, if your blender still smells then you can use a solution of baking soda and water to get rid of the bad odor. Just let it sit in the blender for 10 minutes and your blender will start smelling nice again.
Cleaning your Blender can be easy if done regularly but it can become a difficult task if you clean it once in a while. So, make sure that you clean your blender after every use and follow the above-mentioned steps and tips to get the best result.
Can’t get rid of the stubborn stains? Here’s how to deep clean the blender
